Updates
- Jul 1, 2020. Add @StateObject section. Expand @State section with more speculation about the render tree. Add @SceneStorage and @AppStorage.
What makes SwiftUI different from UIKit? For one, it’s the layout system that I already covered in one of my previous articles. Another, and probably an even more dramatic change, is the data flow.
In UIKit, you have a lot of decisions to make. Are you going to observe changes to data to refresh the UI (aka views as a function of state) or update the UI after performing every update (aka views as a sequence of events)? Are you going to set-up bindings using your favorite reactive programming framework or use a target-action mechanism? SwiftUI is an opinionated framework, it has answers to all of these questions.
SwiftUI is the shortest path to a great app.
WWDC 2019
SwiftUI offers a declarative approach to managing data. As you compose a hierarchy of views, you also indicate data dependencies for the views. When the data changes, either due to an external event or because of an action taken by the user, SwiftUI automatically updates the affected parts of the interface. As a result, the framework automatically performs most of the work traditionally done by view controllers. This approach is often referred to as unidirectional data flow.
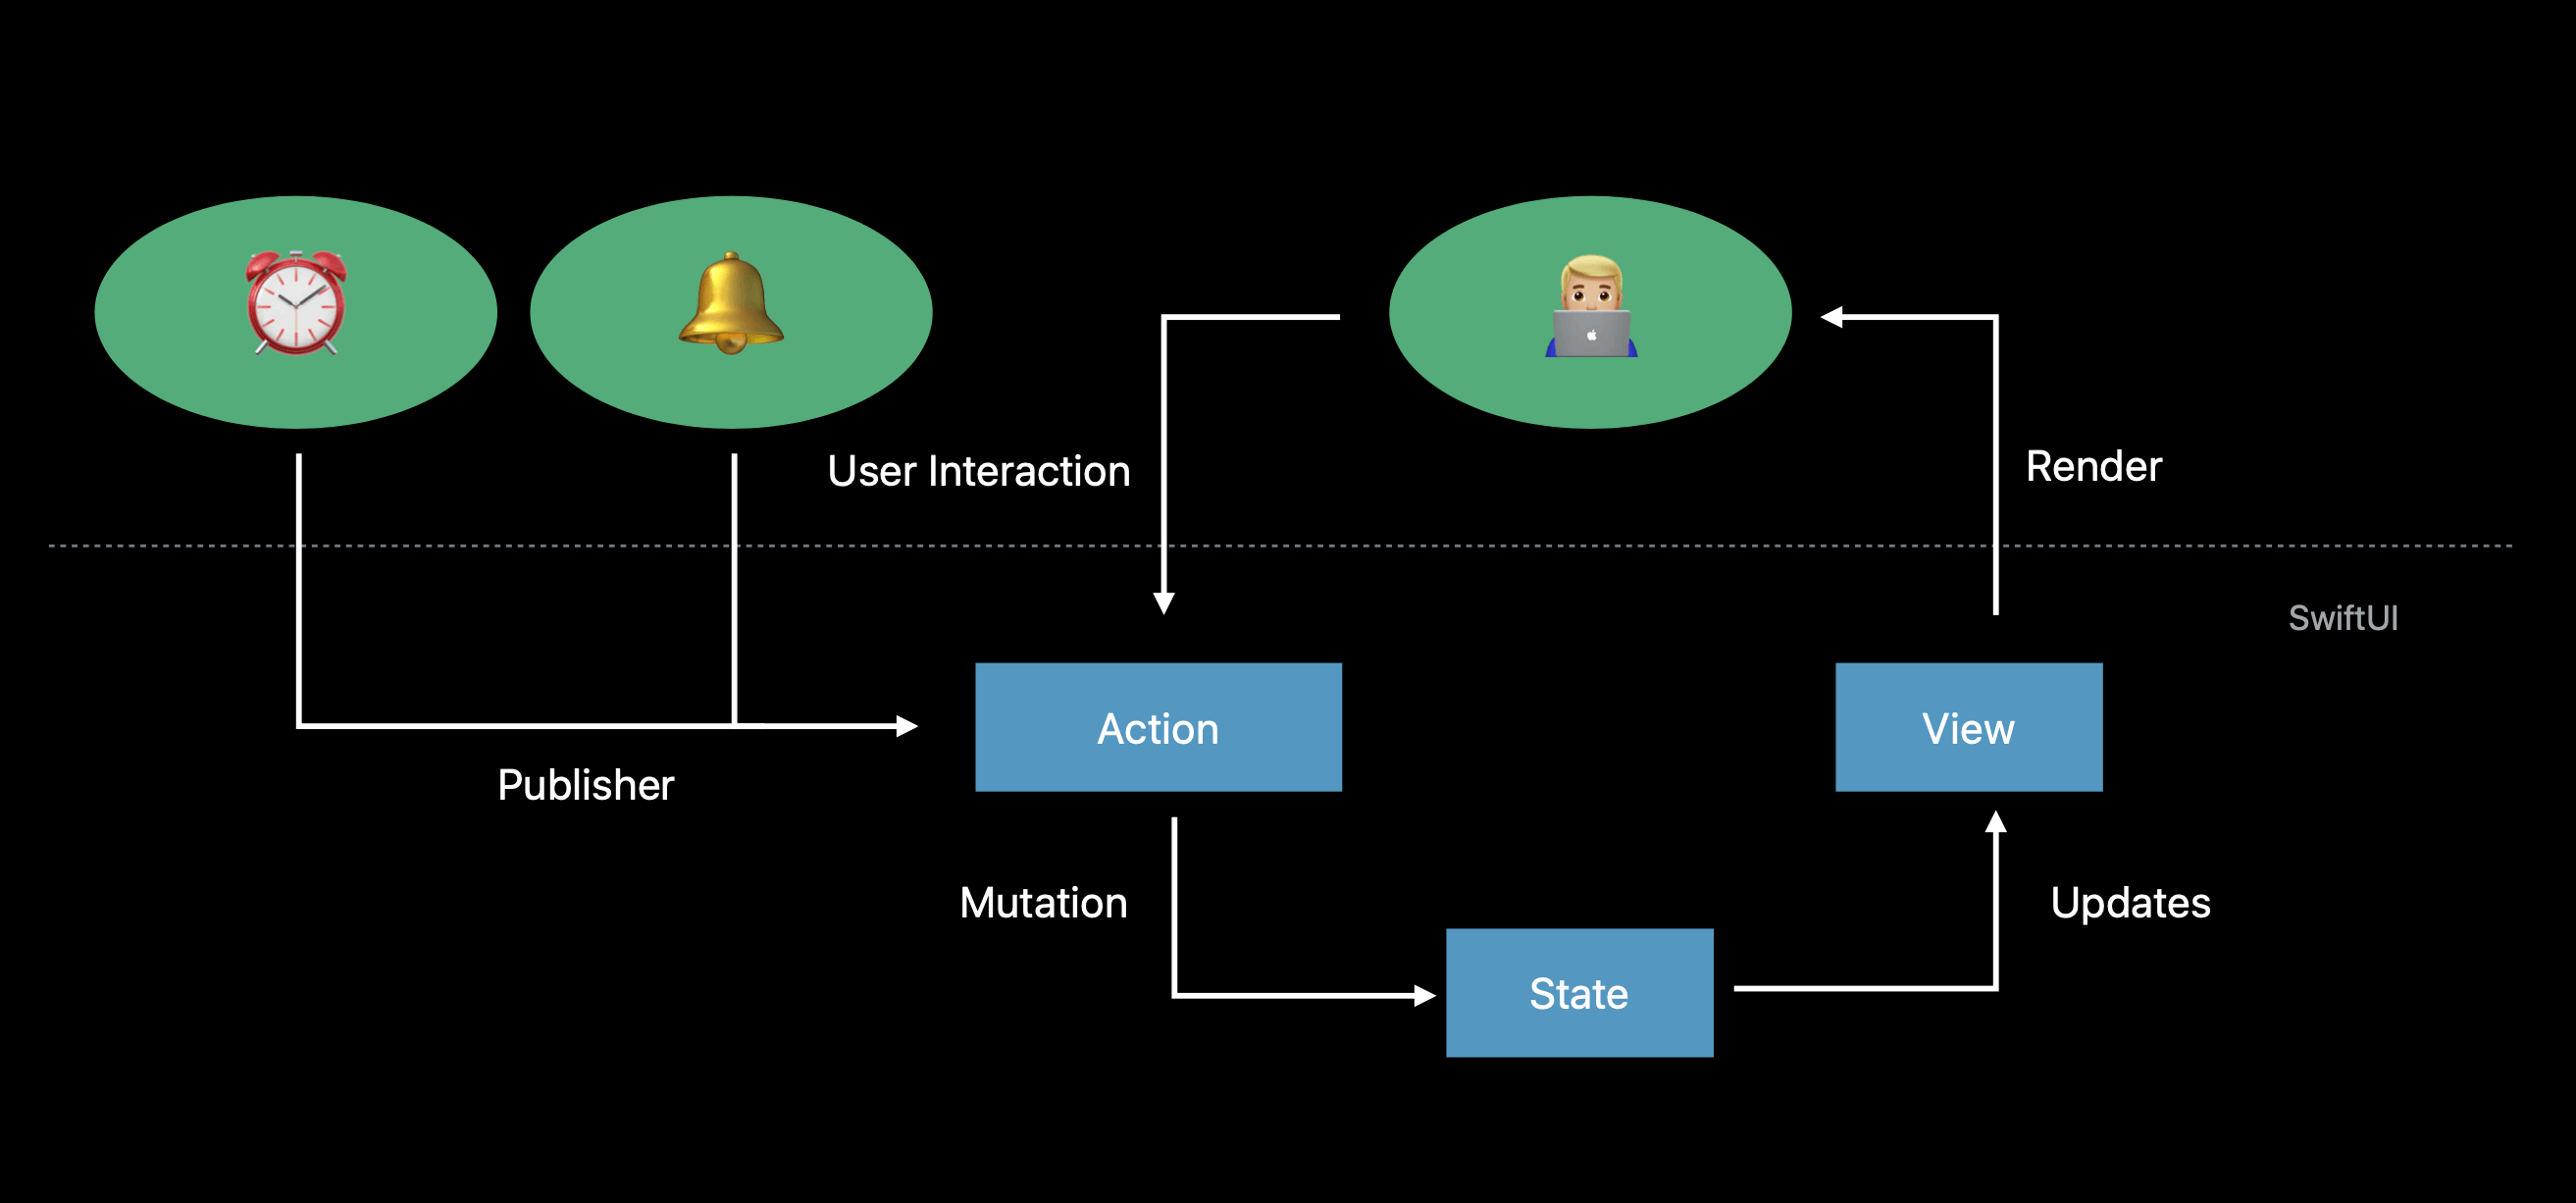
SwiftUI provides a rich set of tools for propagating data changes across your app. Let’s go over all of them, see what they do and when its best to use them. I’m even going to speculate a bit about how they are implemented under the hood.
@Published #
The first and most basic one is @Published.
@Publishedis technically a part of the Combine framework. You don’t have to import it because SwiftUI has itstypealias.
To give you some context, let’s say you are implementing a search functionality in a music player. You defined a view model which you are planning to populate with the search results1 and get the UI to update when the results do.
final class SearchViewModel {
    private(set) var songs: [Song] = []
}
Now, how do you propagate the changes to the songs array to the view? If you were using ReactiveSwift, you would typically use Property type to make songs property observable.
// ReactiveSwift

final class SearchViewModel {
    private(set) lazy var songs = Property<[Song]>(_songs)
    private let _songs = MutableProperty<[Song]>([])
}
This works, but it’s not very nice. You have to create2 a MutableProperty to back a user-facing Property to prevent users from modifying it. Fortunately, SwiftUI provides a more elegant solution:
final class SearchViewModel {
    @Published private(set) var songs: [Song] = []
}
@Published is a Property Wrapper which exposes a Combine Publisher making a property observable.
Property wrappers were introduced in Swift 5.1 to allow users to add additional behavior to properties, similar to what
lazymodifier does. You can read more about property wrappers in the documentation, and the Swift Evolution proposal.
The beauty of @Published as a property wrapper is that it composes well with the existing Swift access control modifiers. By marking songs with private(set) we are able to restrict write access to the property.
final class SearchViewModel {
    @Published private(set) var songs: [Song] = []
}
Another advantage of property wrappers is that to access the current value you can simply write viewModel.songs using the basic property syntax. Compare it to viewModel.songs.value in ReactiveSwift.
Here is what Apple documentation says about @Published:
Properties annotated with
@Publishedcontain both the stored value and a publisher which sends any new values after the property value has been sent. New subscribers will receive the current value of the property first. Note that the@Publishedproperty is class-constrained. Use it with properties of classes, not with non-class types like structures.
Now, what this all means is that by making property @Published, you are able to observe the changes made to it.
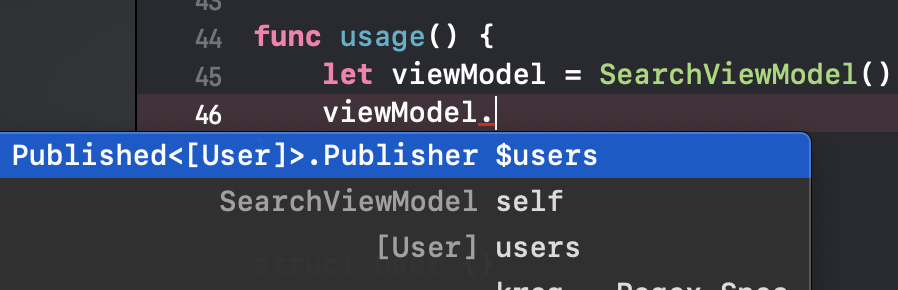
By using $ you access a projection of the property which in case of @Published returns a Combine Publisher.
@propertyWrapper public struct Published<Value> {
    public init(wrappedValue: Value)

    /// A publisher for properties marked with the `@Published` attribute.
    public struct Publisher : Combine.Publisher {
        public typealias Output = Value
        public typealias Failure = Never // Never produces an error
        public func receive<S>(subscriber: S)
    }

    /// The property that can be accessed with the `$` syntax.
    public var projectedValue: Published<Value>.Publisher { mutating get }
}
Because the projectedValue conforms to Combine.Publisher protocol, you can use map, sink, filter and other Combine facilities to manipulate it.
final class Player {
    @Published var currentSong: Song?
}

player.$currentSong
    .compactMap { $0 }
    .filter { $0.style == .metal }
    .map(\.name)
    .sink {
        print("Playing: \($0)")
    }
Let’s see how it works in action.
let player = Player()

print("Will subscribe")

player.$currentSong.sink {
    print("Received value: \($0?.name ?? "not playing")")
}

print("Did subscribe")

player.currentSong = Song(name: "Civilization Collapse", style: .metal)
Will subscribe
Received value: not playing
Did subscribe
Received value: Civilization Collapse
The currentSong publisher delivers the current value of the property synchronously the moment you subscribe to it.
@ObservedObject #
We learned about @Published and Property Wrappers in general, but it’s not enough to know how to update views in SwiftUI.
Let’s start with how you would typically bind the state to the views using a reactive programming framework, like ReactiveSwift. In ReactiveSwift, you either observe the changes and reload the UI. In case of simple properties, you bind them directly to the UI elements.
// ReactiveSwift

final class SearchView: UIView {
    private let spinner = UIActivityIndicatorView()
    private let tableView = UITableView()

    init(viewModel: SearchViewModel) {
        super.init(frame: .zero)

        viewModel.users.producer
            .take(during: reactive.lifetime)
            .startWithValues { [weak self] _ in
                self?.tableView.reloadData()
            }

        // You can bind simple properties directly to the UI elements
        spinner.reactive.isAnimating <~ viewModel.isLoading
    }
}
This gets the job done. In case of <~ binding it does it ion an elegant way – the syntax is minimal and the observation lifetime is automatically taken care of for you. As a result, the views always reflect the latest state of the model – something that SwiftUI also aims to do. How do you do the same thing in SwiftUI?
To start observing the changes to the model, you use @ObservedObject property wrapper. An @ObservedObject must be initialized with a value confirming to ObservableObject protocol.
struct SearchView: View {
    @ObservedObject var viewModel: SearchViewModel

    var body: some View {
        List(viewModel.songs) {
            Text($0.name)
        }
    }
}

final class SearchViewModel: ObservableObject {
    @Published private(set) var songs: [Song] = []
}
Now every time the songs property changes, the SearchView is updated. Now, how does any of this actually work?
ObservableObject is a simple protocol with a single requirement:
public protocol ObservableObject: AnyObject {

    /// The type of publisher that emits before the object has changed.
    associatedtype ObjectWillChangePublisher: Publisher = ObservableObjectPublisher
    	where Self.ObjectWillChangePublisher.Failure == Never

    /// A publisher that emits before the object has changed.
    var objectWillChange: Self.ObjectWillChangePublisher { get }
}
And now this is where a bit of compiler magic begins 🎩✨. By default, Swift compiler synthesizes an objectWillChange publisher that emits the value before any of its @Published properties changes 🤯.
If you didn’t want to rely on the compiler magic, all you had to do was implement objectWillChange manually.
final class SearchViewModel: ObservableObject {
    let objectWillChange = PassthroughSubject<Void, Never>()

    private(set) var songs: [Song] = [] {
        willSet { objectWillChange.send() }
    }
}
Where did @Published go? Turns out, the views in SwiftUI don’t subscribe to the individual publishers projected by @Published3. All they need is objectWillChange publisher from ObservableObject.
The final piece of the puzzle is @ObservedObject property wrapper. All it does is subscribe to an ObservableObject automatically invalidating the view when it changes. That’s it! No magic involved. Except for one small thing… How does SwiftUI know when to update the view?
Unfortunately, we don’t know for sure, these are SwiftUI internal implementation details. However, we can speculate. If you look into @ObservedObject declaration, you can find out that is conforms to DynamicProperty protocol. Turns out, all other SwiftUI property wrappers related to data flow do.
@propertyWrapper @frozen
public struct ObservedObject<ObjectType>: DynamicProperty
    where ObjectType: ObservableObject
As a thought experiment, I implemented a _ViewRendererHost class which uses Swift reflection (Mirror) to find all of the dynamic properties at runtime, including observed objects, subscribe to changes to these properties and automatically refresh the view.
// WARNING: This is not the actual implementation

protocol _DynamicProperty {
    var objectWillChange: AnyPublisher<Void, Never> { get }
}

extension ObservedObject: _DynamicProperty {
    var objectWillChange: AnyPublisher<Void, Never> {
        wrappedValue.objectWillChange.map { _ in () }.eraseToAnyPublisher()
    }
}

final class _ViewRendederHost<View: SwiftUI.View> {
    private let view: View
    private var bag = [AnyCancellable]()

    init(view: View) {
        self.view = view

        Mirror(reflecting: view).children
            .compactMap { $0.value as? _DynamicProperty }
            .forEach(subscribe(to:))
    }

    private func subscribe(to property: _DynamicProperty) {
        property.objectWillChange
            .sink { [unowned self] _ in self.update() }
            .store(in: &bag)
    }

    private func update() {
        let body = view.body // Create a new body with the updated values

        // TODO: render body using some internal SwiftUI mechanism
    }
}
@Binding #
Let’s finish our search example. We need a search field. Unfortunately, at the moment of writing this, SwiftUI didn’t provide one, but we can use an existing TextField for now. To instantiate it, you need to pass a binding.
struct SearchView: View {
    var viewModel: SearchViewModel

    var body: some View {
        VStack {
            TextField("Search", text: Binding<String>)
            List(viewModel.songs) {
                Text($0.name)
            }
        }
    }
}
Binding creates a two-way connection between a view and its underlying model. This is something that you won’t find in ReactiveSwift or RxSwift. It is also relatively complicated compared to other SwiftUI property wrappers.
How do you create a binding? One way to do it is by using the projected value of the @ObservedObject.
final class SearchViewModel: ObservableObject {
    var query: String = ""
    @Published private(set) var songs: [Song] = []
}

struct SearchView: View {
    @ObservedObject var viewModel: SearchViewModel

    var body: some View {
        VStack {
            TextField("Search", text: $viewModel.query)
            List(viewModel.songs) {
                Text($0.name)
            }
        }
    }
}
This feature takes advantage of multiple new Swift language features including @dynamicMemberLookup. If you look at the @ObserverObject declaration, its projected value has a special Wrapper type.
@propertyWrapper @frozen
public struct ObservedObject<ObjectType>: DynamicProperty
    where ObjectType: ObservableObject {

    /// A wrapper of the underlying `ObservableObject` that can create
    /// `Binding`s to its properties using dynamic member lookup.
    @dynamicMemberLookup @frozen public struct Wrapper {

        /// Creates a `Binding` to a value semantic property of a
        /// reference type.
        public subscript<Subject>(
            dynamicMember keyPath: ReferenceWritableKeyPath<ObjectType, Subject>
        ) -> Binding<Subject> { get }
    }

    public var projectedValue: ObservedObject<ObjectType>.Wrapper { get }
}
Interestingly, @Binding itself also supports @dynamicMemberLookup. It allows you to reach properties nested in other types. For example, if you had more complicated search criteria, you could do the following:
struct SearchCriteria {
    var query: String = ""
    var filters: [SearchFilter] = []
}

final class SearchViewModel: ObservableObject {
    var searchCriteria = SearchCriteria()
    @Published private(set) var songs: [Song] = []
}

struct SearchView: View {
    @ObservedObject var viewModel: SearchViewModel

    var body: some View {
        ...
        TextField("Search", text: $viewModel.searchCriteria.query)
        ...
    }
}
Nice. And there is more. You can create bindings with a constant value like this .constant("term") which is useful for testing. Or you could create a completely custom binding using a special initializer which takes getter and setter as input. I couldn’t come up with any use cases for it yet, but it’s nice to know this option exists.
And now, to complete our classic search example, let’s make query observable and sprinkle a bit more Combine4 on top of what we already have:
struct SearchView: View {
    @ObservedObject var viewModel: SearchViewModel

    var body: some View {
        VStack {
            TextField("Search", text: $viewModel.query)
            List(viewModel.songs) {
                Text($0.name)
            }
        }
    }
}

final class SearchViewModel: ObservableObject {
    @Published var query: String = ""
    @Published private(set) var songs: [Song] = []
    private var cancellable: AnyCancellable?

    init(service: SearchService) {
        cancellable = $query
            .throttle(for: .milliseconds(300), scheduler: DispatchQueue.main)
            .removeDuplicates()
            .flatMap {
                service.searchSongs(query: $0).catch {
                    _ in Just([])
                }
            }
            .receive(on: DispatchQueue.main)
            .sink { [unowned self] in self.songs = $0 }
    }
}

final class SearchService {
    func searchSongs(query: String) -> Future<[Song], Error>
}
Please note that this programming style of flatMap-ing over bindings does make sense in this particular example where I need to use Combine to throttle input. However, if I was reacting to let’s say, a button tap, I would just fire the request from the buttonTapped method instead.
@StateObject #
Up to this point, you were responsible for managing storage for your data. SwiftUI offers no guarantees about the lifetime of @ObservedObject or @Binding. You need to maintain a separate tree of objects that manipulate data in your app, be it ViewModels, Services, or anything else.
One of the common mistakes that people make when using SwiftUI is making assumptions about the lifetime of @ObservedObject. The documentation clearly states that you are responsible for managing this storage, not SwiftUI. SwiftUI offers no guarantees about whether it is even going to retain it.
struct ArtistList: View {
    @ObservedObject var store = ArtistStore()
}
SwiftUI will create a new instance of
ArtistStoreevery time a view is re-created, and it discards of the view structs quickly after computing thebody. It might lead to loss of data or to the very least, performance inefficiencies.
New on Apple platforms is @StateObject property wrapper. The wrapped value must be an observable object. @StateObject observed the changes to the wrapped object, similar to @ObservedObject. The key difference is that @StateObject manages the lifetime of the wrapped object for you. SwiftUI keeps the object alive for all lifetime of the view.
struct ArtistList: View {
    @StateObject private var store = ArtistStore()
}
By using @StateObject, the store is instantiated only once per view, right before body runs. SwiftUI keeps the store around for the entire view lifecycle. You can pass the store deeper into the view hierarchy via @ObservedObject, @Binding, or @EnvironmentObject, just as you would expect.
Should you use @StateObject everywhere instead of @ObservedObject? The answer is no. Technically, it should work, but semantically these two primitives are different.
@State #
When you feel that creating an ObservableObject is a bit too much for your use case, there is another tool called @State.
SwiftUI automatically manages the storage for your state properties. When the state value changes, the view invalidates its appearance and recomputes the body.
You must only access a state property from inside the view’s body (or from functions called by it). For this reason, you should declare your state properties as private, to prevent clients of your view from accessing it.
You can get a binding from a state with the
bindingproperty, or by using the$prefix operator.
Here is one of the scenarios where @State can be useful. Let’s say you want to present a temporary screen, such as an alert. SwiftUI wants you to do this declaratively. You need to declare a boolean property that determines whether the alert is presented or not. @State is a perfect tool for this.
struct ContentView: View {
    @State private var isAlertShown = false

    var body: some View {
        Button(action: { self.isAlertShown = true }) {
            Text("Show alert")
        }.alert(isPresented: $isAlertShown) {
            Alert(title: Text("Hello"))
        }
    }
}
Both @State and @StateObject have something in common. Unlike other primitives where you were responsible for managing the lifetime of your data objects, SwiftUI manages the lifetime for you. But how is SwiftUI able to do that? The view structs are value types, with no sense of identity!
View Tree and Render Tree
View structs in SwiftUI are ephemeral. SwiftUI uses them to get the body to know what to render, and then discards the structs. But what happens to the @State? @State clearly has an identity, it is able to outlive the view structs. The process is not documented, but we can make an educated guess about how it works.
There are two separate hierarchies in SwiftUI:
- A view tree, an ephemeral hierarchy of view structs that you create
- A render tree managed by the system where nodes have an identity and persist as long as the view is part of the view hierarchy
When there is a change in a view tree, SwiftUI recomputes the state of the render tree. Each new generation of the view tree is diff-ed against the current state of the render tree. SwiftUI applies the diff as efficiently as possible, adding and removing nodes from the render tree as needed.
Never make assumptions about the lifetime of view structs (structs conforming to View protocol), and never make assumptions about when and how many times body gets called.
Now, what does it have to do with @State? View structs don’t have an identity, but nodes in a render tree do. And that’s where the backing storage for your SwiftUI views is allocated. Again, this is just speculation, but it is the most likely explanation and it is similar to the “reconciliation” process used by React. In fact, we can easily extend the _ViewRendererHost prototype from the previous sections to support @State.
The moment SwiftUI creates an instance of _ViewRendererHost to represent a view in a render tree, it scans through your view struct properties using reflection to find the ones which are @State. For each of the properties, it creates a storage that most likely implements ObservableObject protocol. It then subscribes to its changes.
In fact, if you use reflection to inspect what stored properties @State has, you can see it does have some reference-type StoredLocation type:
(lldb) po Mirror(reflecting: $isShown).children.map { $0 }
▿ 3 elements
  ▿ 0 : 2 elements
    ▿ label : Optional<String>
      - some : "transaction"
    ▿ value : Transaction
      ▿ plist : []
        - elements : nil
  ▿ 1 : 2 elements
    ▿ label : Optional<String>
      - some : "location"
    ▿ value : <StoredLocation<Bool>: 0x600001d299f0>
  ▿ 2 : 2 elements
    ▿ label : Optional<String>
      - some : "_value"
    - value : false
This explains the rules behind the lifetime of @State properties. The backing storage for @State properties is linked to the lifetime of the nodes in the render tree. It is held in memory until the view is removed from the view hierarchy. At this point, SwiftUI most likely destroys the _ViewRendererHost along with all of its subscriptions and storages for @State. But if you simply hide the view using hidden(), the state persists.
The way @StateObject is implemented must be similar to @State. The key is @autoclosure in @StateObject initializer.
init(wrappedValue thunk: @autoclosure @escaping () -> ObjectType)
SwiftUI uses this initializer only once per view lifecycle. When a new view struct is created which linked to the existing view, SwiftUI doesn’t call the initializer and instead injects the existing instance of the wrapped object.
@Environment #
@Environment provides access to the environment of the view. SwiftUI provides a variety of environment values that you can observe. Here are just some of them:
@Environment(\.horizontalSizeClass) var horizontalSizeClass
@Environment(\.accessibilityReduceMotion) var reduceMotion
@Environment(\.accessibilityReduceTransparency) var reduceTransparency
@Environment(\.accessibilityEnabled) var accessibilityEnabled
The view is automatically invalidated when one of the observed environment values changes.
You can also manually modify the environment which comes in handy in previews:
struct SearchView_Previews: PreviewProvider {
    static var previews: some View {
        Group {
            SearchView()
            SearchView()
                .environment(\.colorScheme, .dark)
        }
    }
}
@EnvironmentObject #
In addition to @Environment there is an @EnvironmentObject property wrapper. The @EnvironmentObject is a way to pass all sorts of custom data indirectly down through your view hierarchy. You would typically use it for data that should be shared with all views in your entire app.
This is probably the only part of SwiftUI that I disagree with. Introducing implicit dependencies to my views, which will crash if the value is not provided, doesn’t sound like a great idea to me. It is worth using @EnvironmentObject to save a couple of lines of code? I don’t think so.
Final Thoughts #
I missed @. I’m glad SwiftUI finally brings it back, and in a big way. On a more serious note, I think data flow together with the layout system is the strongest side of SwiftUI. Both systems are powerful, elegant, and robust.
Most of the current complaints about SwiftUI come with regards to its incomplete component library. There are some glaring gaps there. SwiftUI in its current form seems more like a proof of concept which goal is to show that Apple’s platonic ideal of a UI framework can be brought to reality. It has the best syntax, the best data flow, and the best layout system. The only thing that is lacking is the component library and it’s surely just a matter of time when it becomes complete like UIKit (or hopefully better than UIKit!).
Update (Jul 1, 2020). On WWDC20, Apple introduced an enormous number of changes to SwiftUI. Fortunately, most of them are additive and don’t invalidate anything that I covered in this article, or the layout system overview. There are some new convenience data-related property wrappers too, such as @SceneStorage and @AppStorage. They, as well as the existing @FetchRequest property wrapper, are not as fundamental to SwiftUI, so I’m not covering them in this article.
It seems mind-boggling just how many language features were needed to make SwiftUI possible: reflection, complex generics system, property wrappers, function builders, opaque return types, dynamic member lookup. There is a lot to learn! Fortunately, if you ever used reactive programming and MVVM before, your investment was fully worth it. SwiftUI is the closest thing to it as you can get. This new direction for development for Apple platforms makes me excited for its future.
References
- WWDC 2019, Data Flow Through SwiftUI
- WWDC 2020, Data Essentials in SwiftUI
- Apple Documentation, SwiftUI: State and Data Flow
- Swift Evolution, Dynamic Member Lookup
- Swift Evolution, Property Wrappers
-
For simplicity, I’m exposing model objects (
Song) from the view model. If you are closely following MVVM, you would typically want to to create a separate view model for each song instead. ↩ -
Property Wrappers are not an exclusive feature of SwiftUI and can be introduced in ReactiveSwift. There is already a pull request with a proposed changed. It introduces a new
@Observableproperty wrapper. In reality, I think it should completely replace the existingPropertyandMutablePropertytypes. ↩ -
“By default an
ObservableObjectsynthesizes an objectWillChange publisher that emits the changed value before any of its@Publishedproperties changes.”, Apple Developer Documentation: ObservableObject. ↩ -
SwiftUI also closes the debate which is often found in
RxSwiftcommunity whether to make ViewModel pure (aka “pure transformation of inputs to outputs”) or allow views to modify the ViewModels. The former sounds cleaner but it is impractical because it requires you to always create your ViewModels after you create a View. I think SwiftUI makes the right decision and goes with a more pragmatic and flexible approach which allows for “late binding” of ViewModels. ↩